When does Google actually Cache Blog
 5:08 PM |

This is all according to my experience. I kind of figured it out ;) .
If you look for it in Google help, they have used a word GoogleBot, which looks for new stuff and then cache it.
It looks for fresh and really unique stuff, if found, it is cached immediately. This goes for absolutely new blogs, but this doesn’t mean that if that’s not the case with your blog, it won’t get cached. It will, but it might take some time and a number of posts.
If your blog is new, just keep on posting and it will get cached, in a week or two, may be little more, may be less, depends.
Once your blog is cached and your posts are somehow different, they will be cached time to time in no time :) and once you are regular your blog will be cached regularly too.
 Labels:

SEO Show Post name First and then Blog name
4:52 PM |
So, did you create a blog and having trouble finding some traffic (users). Most important thing in your blog is the Post. No one at first cares about what is the name of your blog, they will come for what you have on that blog. Now, here’s the problem, when users surf the web and do searches, the search shows their result, but wait, where did your blog go. It is at the end, with your Blog name in the beginning followed by your post name, so ultimately hardly any one sees it.
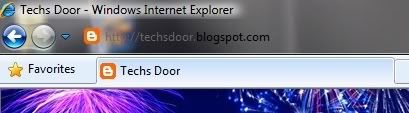
The image below is main page, but this is how it looks with blog name first.
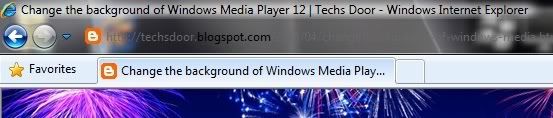
Let’s bring your Post Title in the beginning and then your blog name.
When the changes occur, it will look like the image below.
Sign-in to your blogger account; go to Design and then Edit HTML.
Now look for: (at the moment I can't place html code in post so plz open the paste)
http://tinypaste.com/8a6d9d
You can press CTRL+F to open IE search called FIND and type the whole above thing in it.
Once found, replace it with: (at the moment I can't place html code in post so plz open the paste)
http://tinypaste.com/e4409
Click save. It is Done. The changes will take effect as soon as google cache’s your blog. When Does Google Actually Cache Your Blog?
Once cached, just sit back and see the traffic roll in.
According to me this is the best Search Engine Optimization trick.
Returning Soon...
11:04 AM |
The only thing I try is to keep the content fresh and exclusive, but ofcourse there's always someone who knows it, so it's hard not to duplicate, but what I do is, that I write it in my own way.
My apologies if any subject is duplicated.
For now I'll be placing the images/screenshots to a image host, and will be working on the template and the site map.
The sooner I'll be finished with this, I'll start posting.
Change the background of Windows Media Player 12
5:38 AM |
Now, how to actually place any wallpaper or picture as WMP background.
You will need Restorator 2007 to edit few things.
1) Run Registry Editor and navigate to: HKEY_CURRENT_USER\Software\Microsoft\MediaPlayer\Preferences
2) Search for a DWORD value named LibraryBackgroundImage
3) Change it to 0 to 7 and see the effect. only 0-7 are valid data for this DWORD value.
Now, change it to 6
Go to C:\windows\system32
Look for wmploc.dll (back it up, and take ownership)
Open it with Restorator
Navigate to 257
Now look for LIBRARY_BACKGROUND 7.PNG
Right-click, assign to any pic in the format given i.e jpg
Any resolution and bit will work.

Restrict use of ipconfig command
3:46 AM |
You can type ipconfig in command prompt to view the IP’s.
If you want to restrict the use of this command, follow the steps below.
Go to C:\Windows\System32\
Ipconfig file will be situated in here. You will need to take ownership to make any changes to it, and the right-click take ownership might not work here, so it has to be done manually. See here...
Make a backup of ipconfig file just in case.
Now all you have to do is to rename it anything you wish. The command won’t work anymore. To make it work again, just rename that file to ipconfig.
Take Ownership of file, Manually
5:59 AM |
In Windows Vista and 7, Take Ownership command can be added to right-click context menu, but sometimes it doesn’t work with few files, so it has to be done manually.
Usually this is needed when file is blocked by TrustedInstaller or not owned by user.
Right-Click the file and go to Properties and then Security tab. Now click on Users (YourUsername\Users) under Group or user names:

Now click on Advance and go to Owner Tab and click on edit.

Then click on your user name and press Apply.

Now press ok on two open windows, that only Security Tab is opened. Once more click on Users and this time press Edit.
Once more in new opened window, click on Users and check the full control box and Apply.

Now edit the file as much as you want. :D
Reinstalling MSN Live Messenger
5:08 AM |
To reinstall MSN Live messenger, it has to be uninstalled first, and the right way to uninstall it, is from Add and Remove Programs OR Programs and Features option in Control Panel.
If done that way, there will be no problem at all.
But if you have just entered the Program Files and deleted the MSN Live Messenger folder, you really have messed it up. Not to worry, there’s a solution for that.
While reinstalling it, it would be giving an error that, it is already installed & uninstall it first.
Here’s what to do:
Go to C:\Windows\Installer
*Installer is a hidden folder, so just type the address in the address bar.
Once in this folder, move down, you’ll see few windows installer files.
Look for the ones between sizes 700 – 790kb. Right-Click on that file and go to its properties, then Details tab and look the Subject there.
You have to look for the file with Subject - Windows Live Messenger Setup Package.
Once found, Right-Click on that file and uninstall it.
This is it, now try to install the Live Messenger again & it’ll work.
Trouble shooting MSN Live Messenger…
Before Reinstalling Windows
6:32 AM |
Few files are stored in places which you might miss to see and loose them. Here I’ll identify those places.
Most important is:
(For Vista & 7) C:\Users\YourUserName\
(For XP) C:\Documents and Settings\YourUserName\
This folder might contain few files which might come in handy, such as Saved game Files, etc.
Under YourUserName there is a hidden folder AppData(for Vista & 7) & Application data(For XP).
What to do after fresh installation (Comming up...)
Compress Video to 55% without Damaging the Quality
2:11 PM |
MKV (Matroska Video) format is the most compressed format of a video file (with best quality, of course).
Requirements:
DivX Converter 7.0 OR 7.2 (Registered)
KMPlayer (to Play the converted file)
Most preferred format for converting is AVI. File will be converted to MKV format. Conversion will take some time, but the video will be compressed to approx. 55% without damaging the quality.
Once DivX Converter is installed, open it & set it to HD 720p, not necessary though.
Now click on View List and add the video file to convert.

Now Select the file and click on modify.

First click on Advance.

Then, change the option Certification Profile to DivX Plus HD Profile.

Once done, you will notice that the estimated file size will be reduced. This will not be the maximum compression, so check the box Limit Filesize to and enter any desired size.

Here, I have set the size to 1mb, but the Estimated File size shows 1.64mb, so to give it some space, make it 2mb.

Press ok & then press CONVERT.
Conversion time will depend upon the file size. Converted files will be saved to C:\Users\Username\Videos\Divx Movies\
That’s it. Video will be converted to MKV and compressed to approx. 55%.
Use KMPlayer to play the file.
Enjoy! :)
Notification area Icon Hider
6:16 AM |
At times, beside the clock, a lot of icons gather and there is no Arrow Icon to hide them.

It usually gets disabled. It is really simply to enable again, which few people miss the option of.
Go to Control Panel and open Notification Area Icons.

All you have to do is uncheck “Always show all icons and notifications on the taskbar” option & that arrow will be showed.
Cannot view LAN PC on Network
12:39 PM |
Sometimes, due to heavy processes or bugs, you might not view all the PC’s connected to your LAN, in the Network option.
If you are sure to have that PC connected and is not viewed on Network, here’s what to do.
Open RUN (CTRL + R) or type in Start menu Search (Only for Vista & 7).
\\ComputerName-YouWishToConnect
And press enter.
*Remember to type-in the full name with – in it. It can be viewed by checking Properties of My Computer (Right-click on My Computer and go to Properties), and look in front of Full Computer Name. You have to type that name after \\
Ever Noticed 3 ... in front of few options in Windows
12:30 PM |
The 3 … in front of few options in windows, means that, whenever you press that option, a window will open for further options.
Create Restore Point
11:57 AM |
Creating a restore point is much safer than backing-up the registry.
Most of the software’s make it before installation, so that your system could be restored later if that software conflicts with any of the system files.
You can make it manually too.
Right-Click on My Computer and go to Properties. Now make your way to System Protection tab.

Use the Create… Option and type a name for it. It hardly takes a minute to make restore point.
Once done, use the System Restore… Option anytime to bring your PC back to the point where it was, when that Restore Point was created.

Restoring will not harm any of your saved files, but it’ll uninstall any application installed after that. This process is totally reversible by using the System Restore… Option again.
Related...
Create Shortcut for Folders and Web pages
3:20 PM |
One way to create shortcut for folders is to, right-click on it and then click on Create Shortcut option OR right-click on the file and then Send To |Desktop Create Shortcut.
Here’s the easiest way to do so.
Whenever you open a Folder or a Webpage, if you see at the absolute left of the address-bar, there is an icon over there.
All what you have to do is to drag that icon anywhere you want its shortcut. The moment you’ll leave it the shortcut will be created.


Windows 7 Taskbar Right-Click Options
3:07 PM |
Try to click (left-click) & hold any of the taskbar items and then drag upwards. It’ll show the right-click options.

This may come in handy while using laptop.
Add Folders to Send to Option
2:52 AM |
If you want to send files to multiple folders at the same time, it might take time to drag files to specific folders separately.
You can simply add those folders to send-to option, so that you can just right-click on the file and send it to that folder.
Here’s what to do:
Right-Click on the folder which you want to add to send-to option & create its Shortcut. Now, once the shortcut has been created, cut it (Ctrl + X) & paste it (Ctrl + V) into:
C:\Users\Ultimate\AppData\Roaming\Microsoft\Windows\SendTo

You may rename the shortcut as you want.
To remove it from send-to option, simply delete its shortcut from that folder.
Exit Explorer
5:34 AM |
One of the previous posts was about Hidden Exit Explorer Option in Windows Vista & 7. Here is a common method to do so.
It comes in handy when you don’t want the kids to mess with the PC when you are not around.
Press Ctrl + Shift + Esc OR Ctrl + Alt + Del to open task manager & make your way to Processes Tab.
Now look for explorer.exe, then click on it and press End Process OR Right-Click on it and End Process it.

Doing this will make everything on the desktop, vanish. In other words, anything could hardly be done now.
To bring everything back, Press Ctrl + Shift + Esc to open task manager. Click on File |New Task (Run) & type "explorer" without quotes & press enter.
Everything will be back to normal.
Add “control userpasswords2” User Accounts icon in Control Panel
4:08 AM |


Here I’m going to explain how to place an Icon of this User Accounts in Control Panel, for easy access.

To differ it from the actual User Accounts, it has been named User Accounts 2.
To do this, all you have to do is to download the following .reg file and open it by double-clicking on it and accept all the warnings.
Next time you open your Control Panel, you’ll see a new Icon, named “User Accounts 2”
Download Links:
Mediafire:
Download
Now, once you have done this, you might not see the same icon as shown is the above picture.
If you can live with that, it’s your wish, but if you want to apply the same icon, then follows the following steps.
download the icon.

*Do not right-click and save the above image because, to apply icon, the image has to be in ico format 256x256, so it would be better to download the icon.
Download Links:
Mediafire:
Download
Once downloaded, save it someplace safe.
Open Registry Editor, by typing regedit in RUN (Win Key + R)
Then go to
HKEY_CLASSES_ROOT\CLSID\ 98641F47-8C25-4936-BEE4-C2CE1298969D\DefaultIcon
In right-side pane, double-click on “(Default)”, a small window will open.

Under “Value data:” type the address where you have placed the icon (C:\Windows\ico\29793.ico) and press ok and close the Registry Editor.
Now open the Control Panel and you’ll see the new Icon.
Done!
Create Registry Backup
2:14 PM |
Using System Restore is a better option than to create a registry backup. Still, if you want to create Registry backup, here’s what to do:
Open Registry Editor by typing regedit in RUN (Win Key + R).
Now, on menu bar click File | Export
Remember to click on ALL (in Export Range) (This will back up the WHOLE registry), before you save.

Now just name the file and click save.
Give it some time to save it.
Once saved, double click on the file to recover the registry (When needed).
